
What is the difference between the 2 roles?
- An admin can view/invite/edit/delete a user in the member page.
- A member can only view the list of members in the member page.
- Both of them have the same right in campaign management
The first Admin role must be granted by Displayce when our sales team create your organization account.
Once granted, the Admin can invite as many admins as he/she wants.
As an Admin, exclusively you can:
- Invite New Users: Add new members to your account with either admin or member roles.
- Resend Invitations to users who have not yet accepted the invitation.
- Assign or Change Roles: Adjust the roles of existing users to ensure they have the appropriate level of authorization. (However, Admins can not change their own roles to prevent errors.)
- Delete Users: Temporarily revoke access to the platform for certain users.
- Re-Invite deleted Users: Restore access to users who have been previously deleted.
- View who are part of the organization and their roles
- Member can not invite, assign roles or delete users.
Both Admins and Members have the same rights to manage campaigns.
Step-by-Step Guide for Admins to Managing User Roles and Permissions
1. Accessing the Member Management Interface
To begin managing users, follow these steps:
- Log in to your DSP account.
- Click on your organization's name located at the top right of the screen.

- You will be redirected to the Manage Users page, where all the users in your organization are listed.

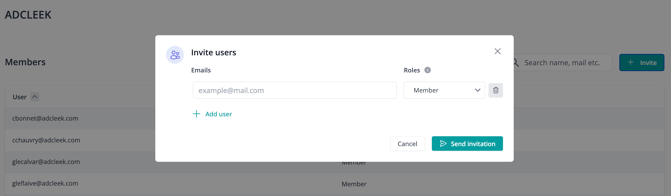
2. Inviting New Users
- On the Member Management page, click the + button on the top right of your screen.
- Enter the new user’s email address and select the appropriate role (Admin or Member).You can invite several users in a row.
- An invitation email will be sent to the user with a link to sign up and join your organization.
3. Assigning or Changing User Roles
- In the user list, find the user whose role you want to change.
- Click on their current role, and a side panel will appear including a dropdown menu with user roles.
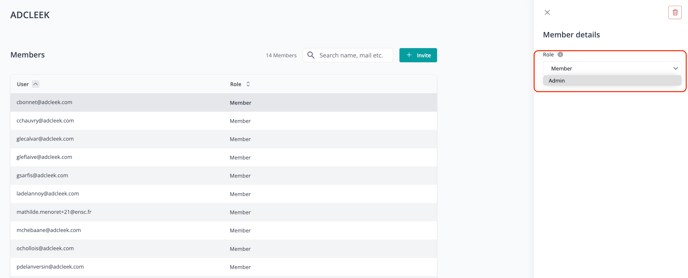
- Select the new role (Admin or Member) from the dropdown.
- Confirm and Save.
4. Resend Invitations to users who have not yet accepted the invitation.
For users who have not accepted the initial invitation, you can resend them an invitation email by clicking on the "Resend Invitation" button.
Note: there is no limit on the invitation email that can be sent to a user per day. (They can be spammed if you click on the button several times. 😉 ) After accepting the invitation, it will take around 1 hour for the status to be updated.

5. Delete a User
- In the user list, locate the user you wish to delete.
- Click on it to open the side panel.
- Click the delete button next to their name.

- A confirmation message will appear:
- Confirm the deletion. The user will be removed from the active user list and will no longer have access to the platform.
5. Re-Inviting a Deleted User
- Navigate to the Manage Members page and click the "+" button.
- Enter the email of the user you want to reinvite.
- The user will receive a new invitation email, allowing them to regain access to the platform.
FAQ
How can I invite an person who already has an account on the platform

If you encounter a message like this when trying to invite someone, it means that the user's email address is already associated with another organization. Since our platform currently doesn't support switching between organizations with the same email, we recommend using an alias email address by adding a "+" after the username.
For example, if the email david.frey@music.com is already in use, you can invite the user with david.frey+1@music.com (you can use any text after the "+").
The user will receive the invitation email in their main inbox. However, please note that the invited user will need to log in with the alias email address.
How can I sign up to the platform after receiving an invitation?
- When an admin invites you to join the organization, you will receive an invitation e-mail.
- Click on the
 button and you will firstly be redirected to our login page. From there click on the Sign-Up button to create your account with e-mail and password. Alternatively, you can also sign up with your gmail if you have a google account.
- In the Sign-Up page, please define
- Username: by defining the user name, you will be able to either sign-in with it or with your email address. Please note that the user name can not be your email address and special charactors including the space are not supported.
 Once you are all done, click on "Continue".
- You will than be redirected to the "Terms and Conditions of Sale" page. You must accepte the conditions to continue.

- Welcome board!